4.) How did you use media technologies in the construction and research, planning and evaluation stages?
- As a group we used many media technologies in the construction, research, planning and evaluation stages of our media products. The points mentioned below are areas I personally did.
Editing
Titles
Wording of the Titles
- Creating the wordings of the titles was a difficult task that the whole group had an input in. I came up with variations that we could use and as a group we attempted to alter these variations to suit the genre and narrative. Our titles needed to be obvious due to the fact our trailers's narrative was a bit complicated. The wordings of the titles was key to ensure the audience's comprehension of our trailer and so I spent a lot of time redrafting these phrases.
- Once we had the final wordings of the titles we could start making our titles.
Initial attempts
- When first experimenting with different styles of titles we drifted down a more slasher horror route which didn't match our genre.
- We started out by having an 'old paper' look for our background, the font we used looked like calligraphy and after using the 'smudge' tool looked like it was leaking down the page. We then added in blood splatters such as a hand and blurred the ink and blood together. Although these titles did seem rather effective, they did not match our genre at all and would have stood out when watching the trailer.
- We also edited these on photoshop and so they would have been still images, this would have meant that none of the words would have been duplicated and they wouldn't have been very distorted.
Development and creating our final titles
- When deconstructing films and trailers the titles for both Number 23 and Pi stood out to us and we felt like recreating a similar effect for our own trailer.
- For example throughout Number 23's trailer there were images and signs constantly flickering up onto the screen. We felt this had a psychological effect which would reinforce our trailer and so we attempted the similar effect on our titles.
- Pi's trailer had the words in the title double and smudge together, we felt this was also very effective and would reinforce our genre. The doubling of words clearly connote that something is mentally disturbed or something isn't right, and as our genre is a psychological thriller we felt this was suitable.
- To create them I first opened final cut pro and chose a plain white background as we felt this would best match our colour scheme and general package. Then, using the same typography as the tagline 'Dark Ages' I wrote in the phrases I had created.
- After this I decided that having our titles gradually get more and more distorted would reinforce our narrative as it would represent how our protagonist's mental illness gradually gets worse through the trailer.
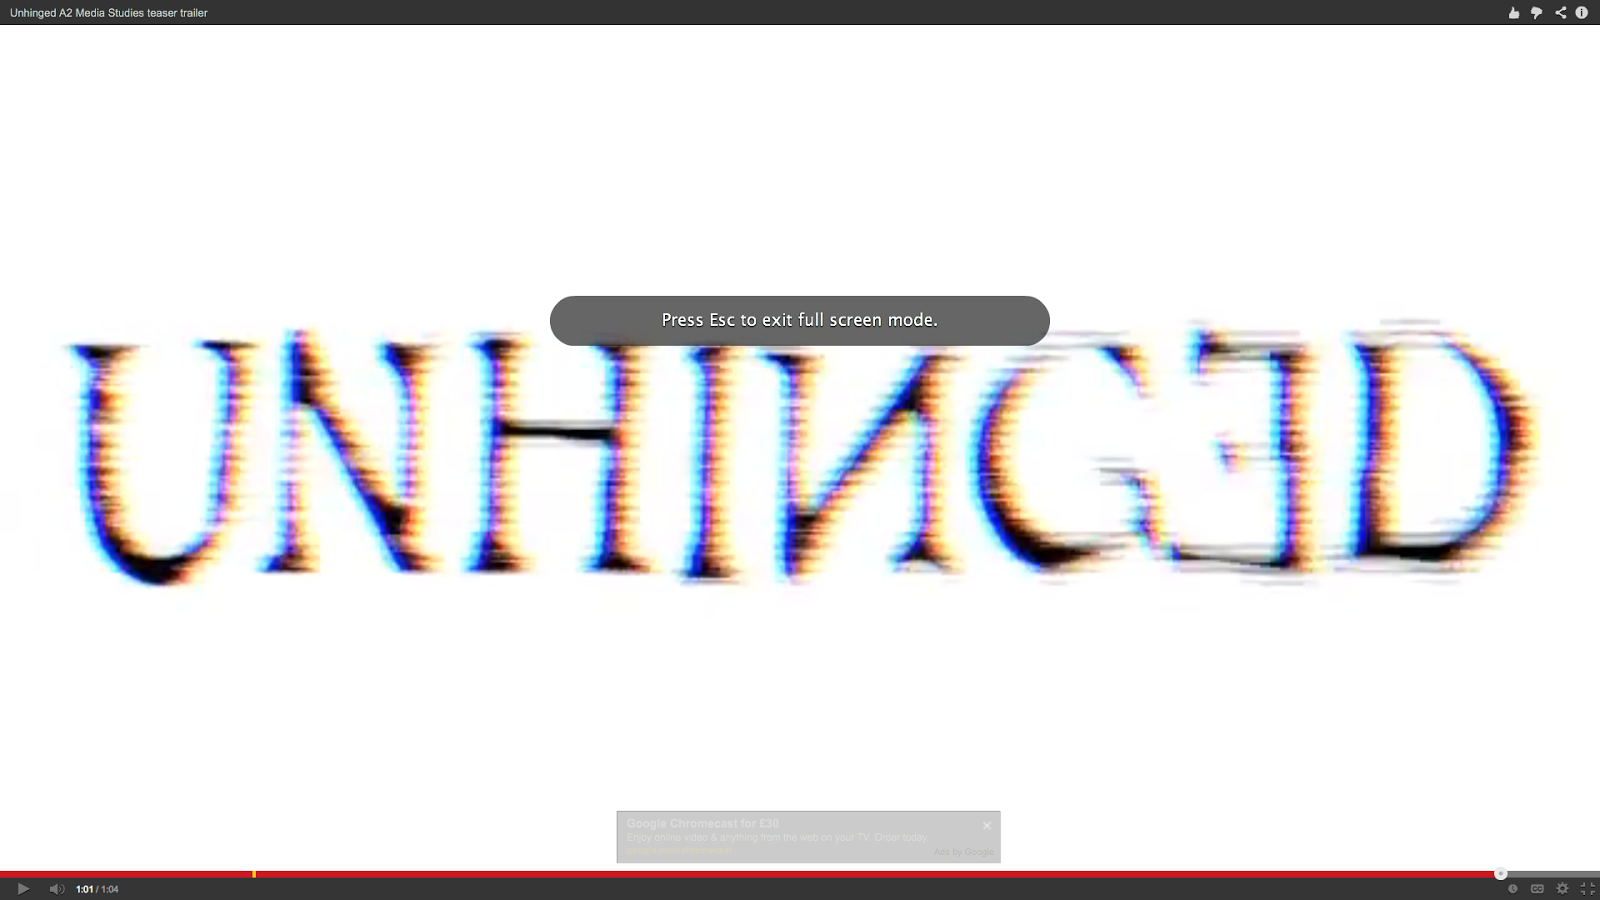
- On the first three slides I applied effects called 'projector' and 'bad TV' and gradually increased the amount on each slide. In the final slide before the montage and climax I increased these effects to full and then repeated the word 'herself' which was layered over the title and was competely distorted.
- I also created the final title at the end of the trailer which said 'UNHINGED' and 'COMING SOON.' This required much more precision as I felt it would look effective if the title's colours were inversed for a milisecond before going back to the original title. I repeated this a few times and had to alter how long each slide would flash up for. I also applied 'projector' and 'bad TV' on both the background and the actual title so that the whole image looked completely distorted. So that this would have a lasting effect I layered the non diegetic sound 'metal impact' which was used throughout the trailer. This meant that the ending linked in with the rest of the trailer and the title was forceful when it appeared at the end.
Bedroom scene
- I also edited the scene in which our protagonist is stalking our antagonist with a partner. For this scene we felt that close up shots of our antagonist slipping on some tights would be effective as it would be quite an intimate shot, making the scene creepier.
- We also had a shot in which our antagonist was removing her nightgown, but cut it before the nightgown fell off so that the audience could understand what was going on.
- This was then cross cut with shots of our protagonist on her laptop watching our antagonist get dressed.
- We had a contrast between shots taken from the laptop and shots that we took on teh camera due to the differing colour levels and levels of quality between the cameras. The hand held camera was also higher in saturation and so we felt that it added substance to this scene.
- We were able to achieve effective angles with the hand held camera such as an ariel shot of our antagonist drying her hair, this made the scene more dynamic and creepy. This scenes were cross cut with the full shot of the room filmed on the webcam.
 I also had a part with the mise en scene of the bedroom, we completely changed the room to suit our character by removing all the books on the shelves and replacing them with makeup. We also asked all members to bring pink items and scattered shoes and bras around the room. Once we had done this we printed our images of Justin Bieber and One Direction and stuck them up on the walls. This meant that we could fully develop our character and were able to completely show what our antagonist was like to the audience. Final Tweaks
- Finally I made additional tweaks throughout the whole trailer, for example using the trimming tool to cut down milliseconds off individual clips therefore making the whole trailer just over a minute.
Audio
Audio of newsclips
Audio of newsclips
- The audio in the montage scene was key in raising the tension for our final jump and had it been done badly our final scene in the loft would have seemed random and ineffective.
- We firstly felt that including the audio of newsclips in our montage scene and layering them so they became overpowering would be effective as it would allow the audience to experience what is going on inside our protagonist's head.
- In order to do this I had to research for these news clips, and after downloading them I had to select the part of the footage I wanted and detach the audio. This meant that I was free to place the audio wherever I wished. I duplicated a few of these clips and added in more. The types of news clips I chose were ones linked to mental health, for example one clip clearly stated 'schizophrenia.' This meant that our audio explicitly linked in to our narrative, so the audience would be able to understand our trailer is about mental illness.
- Once having layered all the sounds over one another I was finished with the structure of the audio. However I felt that it was missing something and some clips sounded too 'normal.' Therefore I experimented with various sound effects Final Cut Pro provide such as 'Monster' or 'Alien.' This meant that I was able to distort the voice and the overall montage scene would be creepier and would defintiely raise the tension. I then went about finding effects that created an echo so that these clips would really sound overpowering and would explain that our protagonist is tormented by her thoughts.
Cinematic 'booms'
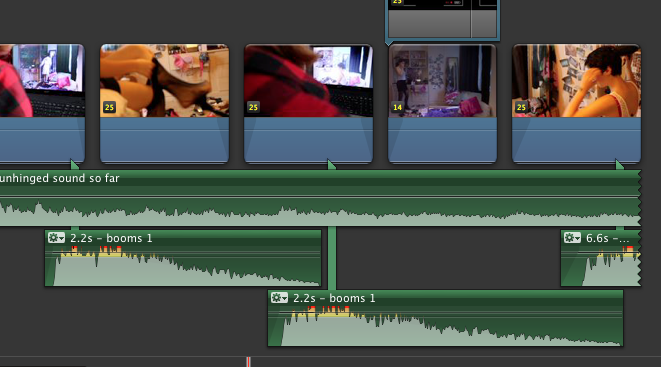
- However even though the news clips I had inserted made the montage scene scarier, the scene was missing cinematic 'booms' that would speed up by the end of the scene.
- The process of finding and inputting suitable booms was problematic for us as we were for a while we couldn't find a short, powerful boom. Eventually we found a suitable one on youtube and downloaded this. I then had to drag these 'booms' into the right place in the montage scene.
- This process was problematic as I had to do this by ear and so made a few errors which was time consuming.
- I had to make sure each boom would arrive slightly faster than the previous one in order to increase the tension for the ending. After trial and error I had finally finished a piece that successfully raised the tension and that didn't sound strange.
Filming
Green screen- One scene I filmed was the green screen where the protagonist first sees her imaginary friend.
- We firstly needed to buy the green screen, after doing this we set up the filming area by hanging the cloth on a black flat. I then shortened the tripod to adjust the height of the camera as our protagonist was seated on the floor.
- We had to ensure the green screen was correctly lit and there weren't many shadows as this would have posed a problem for us later on in editing. I had to check that the green screen was okay through the camera and ensure that our protagonist's head was correctly framed.
- Because editing green screen can be problematic if the footage is incorrect, I drew a line where our actor acting as the protagonist wasn't allowed to pass. This was halfway down the screen, the other side was reserved for the imaginary friend.
- I had to keep refilming this scene as occasionally our actor would push the boundries and if we merged these images together the two characters would have been overlapping.
- The framing of the camera was key, as was ensuring that the camera was steady and at the same angle each time. This was because if the two sets of footage were different, it would have been obvious when we merged them together, as we learnt from our trial.
 I also filmed the scene within the bathroom where the protagonist drags her makeup down her face. This location was problematic due to the mirror, as in many shots the camera could be seen. I had to experiment with different angles to get the most effective shot without being seen in the mirror. This required the use of the tripod to get the camera at the right height and I had to use the zoom and focus function.
- I filmed parts of the bedroom scene, this being an over the shoulder shot of the protagonist watching the antagonist in her bedroom and a tilt of the protagonist on her laptop. These scenes were also difficult to film as often the camera was caught in the reflection of the laptop screen, and so I had to experiment with different angles in order to avoid this.
- Additionally I also used the focus function to focus in and out of the footage on the laptop screen, which made the footage more dynamic and interesting overall as it wasn't just a boring shot.
- I also filmed the time lapse. This required setting up the camera on the tripod and ensuring that the protagonist was correctly framed and you could see her.
- Although this was simple, we had to refilm this many times as the camera often died or various other problem occurred such as the sun disappearing over a cloud or a dog bumping the tripod.
- We finally got our time lapse after refilming it 4 times, and were pleased with the result.
Poster
Initial Design
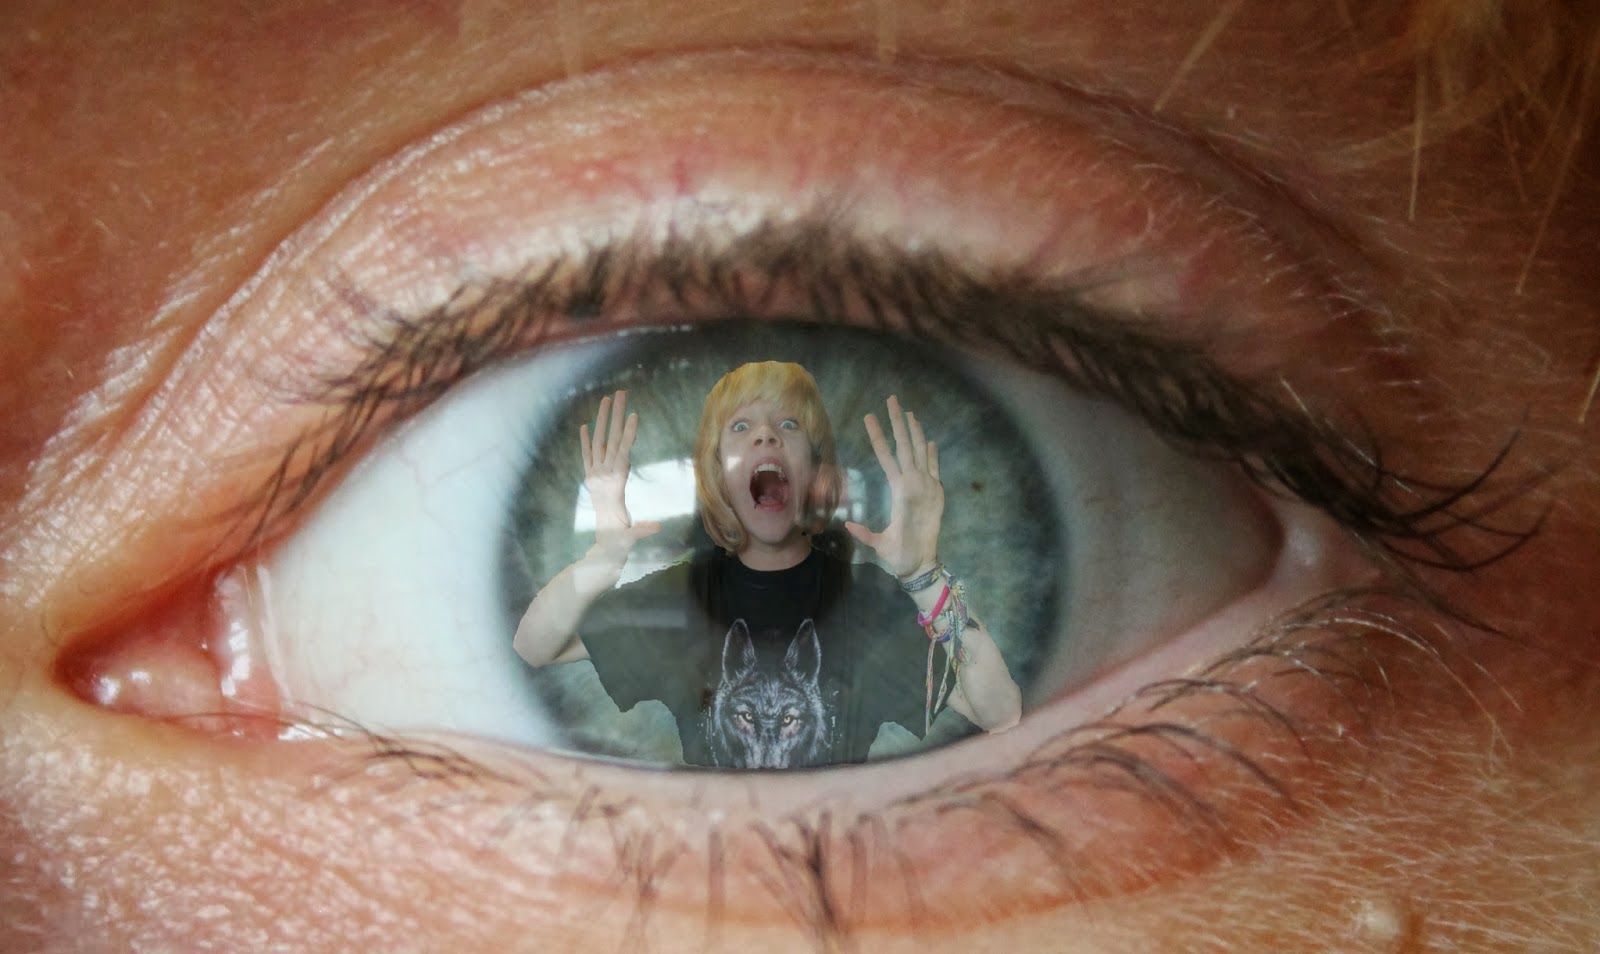
- I also had a big part in making and developing our poster. To begin with we experimented with different effects available on photoshop. I took pictures of our protagonist and positioned her so that in some it looked like her imaginary friend was looming over her.
- The example shown on the left is a close up picture of our protagonist's eye, I then also took a picture of our protagonist screaming with her hands up, this meant that edited together it would look as if she was trapped inside herself.
- After experimenting with effects we decided as a group that we would like the inclusion of our imaginary friend in the poster. We first learnt about this when editing the images I had taken together.
Our poster creation and development
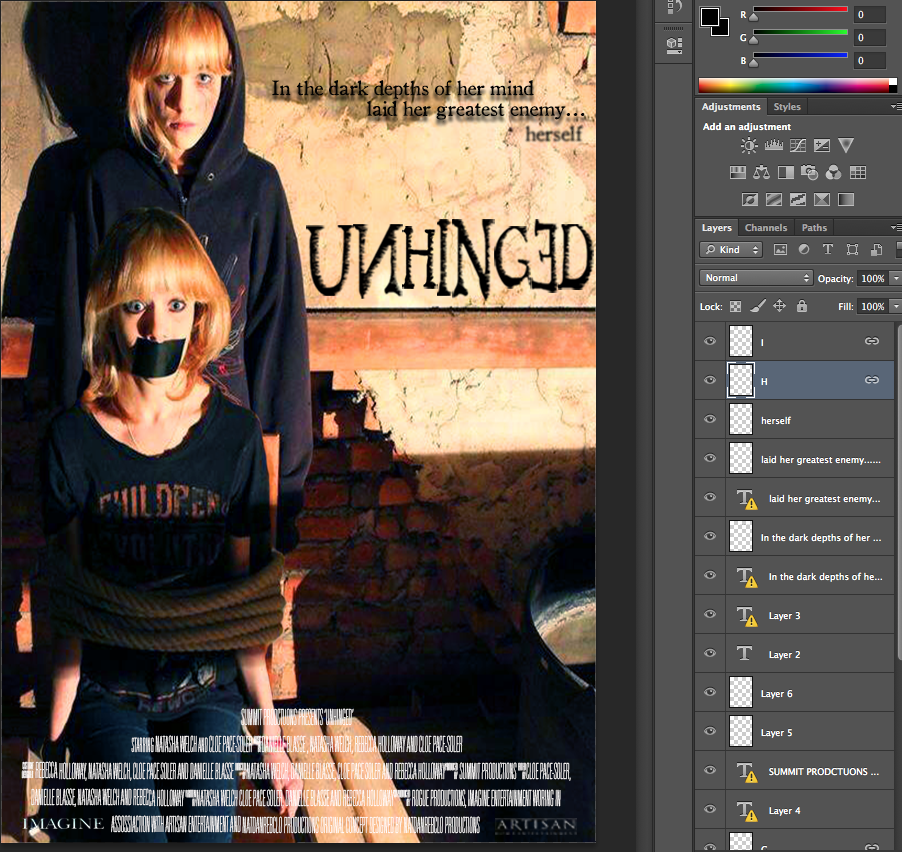
- When it came to making our actual poster we had a few pictures to choose from. We decided to use the images taken in the loft as the lighting and overall message of the image suited our genre perfectly.
- The images were merged together and I then took control of the typography on the poster. When creating the tagline I duplicated the sentence and staggered the two lines, I then used 'field blur' on photoshop to blur the bottom line so that it created a shadow. Although this was effective, it made the text much harder to read from afar and this had to be undone.
- I then created the cinematic information at the bottom, this gave the poster a more professional look and so the poster was more believable.
No comments:
Post a Comment