Danielle Blasse 7010 - Cloe Pace-Soler 7352 - Rebecca Holloway 7279 - Natasha Welch 7399
Townley Grammar School - 14109

Monday 31 March 2014

Evaluation Question 3 - Danielle

Evaluation Question 3

What have you learned from your audience feedback? 

Survey
  • After conducting a survey on the basis of our initial ideas about our 60 second teaser trailer the feedback we received helped us to establish large parts of the narrative and consolidate ideas that we had primarily agreed on. One of the main aspects that we chose to concentrate on within our survey questions was the representation of the protagonist and antagonist. 
  • We asked questions regarding mise-en-scene and costumes. It was a great opportunity to allow our audience to get a say during our planning stages of our overall package as it allowed us to air our decisions and obtain critical feedback that aided our decisions, as you can see from the image on the right

    YouTube
  • From our audience feedback we had to take on board a moderate amount of small changes. Reoccurring comments focused on areas of the sound and camera angles that suggested that the protagonist and antagonist had a friendship. After taking on board the feedback we made  final tweaks to the sound  by building the tension in the sound earlier before the montage scene to avoid a feeling of detachment in the sound.
  • Our audience noticed that the "booms" leading up to the montage were not effective enough, however after some consideration we realised that the build up in sound towards the montage was actually not effective enough at all.

  • To overcome this issue, we decided to not use the same "boom" track in the build up to the montage that is already being used in the montage. That way, the new timbre of the "boom" in the montage will have a bigger and more effective impact on our audience as it's not a sound that they have already heard in our trailer. It makes it less predictable. We decided to cut the piano track earlier than we had previously, therefore it didn't play during the montage scene.

  • Additionally, we also also cut the "woosh" audio clip from one of our audio tracks that were previously used in the trailer and applied it to the end of the title to create a bridge passage between the sound of the scenes before and the montage scene. Once we had applied all of these changes to the sound, we copy and pasted the "booms 1" track below the "woosh" creating another layer but we cut to the climax of the "boom 1" audio clip and this added to the tension and created an entrance that was needed for the montage scene.
  • Furthermore, the "boom 1" track was cut as close to the climax of the track as possible, this way the booms got faster as we neared the montage building up suspense and anticipation in the trailer. Using track "booms 1" instead of the "booms" track which were used in the montage scene allowed us to pace ourselves a lot more in the build up rather than building up the tension in the wrong place altogether. Overall, this solved the problem and the booms used in the montage scene, proved to be more effective.


  • The feedback also allowed us to look at our trailer in a much more critical light and for us it definitely gave us the opportunity to be able to make informed decisions based on the response from our audience. It was made aware to us that the narrative may have been unclear at points in the trailer due to using camera angles and editing, therefore we chose to cut out on the amount of eye line matches we used between the protagonist and the antagonist. 


  • Our audience feedback benefited us majorly as it allowed for our audience to suggest what would be more effective and this solved the issue we had about certain parts of footage that we were indecisive to remove or keep. Our audience feedback also highlighted areas of our trailer that we had not picked up on such as the sound layers not following on from each other and certain camera angles making the narrative unclear to hard to follow. 

Evaluation Question 2 - Danielle

Evaluation Question 2

How effective is the combination of your main product and ancillary texts?

  • The combination of our teaser trailer and ancillary texts is effective as a cohesive package. During the planning and production stages of our trailer, website and poster we decided to avoid the conventional black, white and red colour scheme. Instead, we opted to adjust saturation of the images for our poster and website to illustrate the psychological notion of our trailer. This idea was established through trailer deconstructions such as Dark Water. 
  • Prior to producing our typography for our coursework we carried out multiple typography trials in aid to select the most effective typography to work with our trailer, poster and website. However, an issue that we did face was the manipulation of the text without it looking too unprofessional. We also carried out extensive font research of we had a bare basis to work with when manipulating our typography. We chose to use a font called Dark Ages as it was simplistic enough to manipulate. With the use of Photoshop we were able to achieve the typography we wanted by tiling, flipping and editing specific letters for it to fit the title “Unhinged” effectively, therefore we flipped letters around and manipulated their spacing on our poster and website conveying the detached nature that the narrative entails.
  • In terms of our typography for our tag line, we need to make sure that it is different from the typography that we used for our title. 

  • We decided to use the font called "OldStyle" as we thought it was basic enough to manipulate and it also fit in well with the rest of our chosen typography. I started off by opening up a new file in Photoshop and making sure that my canvas was transparent therefore allowing it to be transferred onto our poster without any fuss. When typing our tagline into Photoshop, we decided to separate "herself" from the majority of the tagline so it would give us the option to move it around our poster.
  • In order to manipulate our typography we applied a "wind" effect to our tagline. To do this we went to filter - stylize- wind and then selected wind from the menu going from the right. This made the typography look extremely worn out. This fits in well with our poster and our title as the mise en scene looks worn out as does our typography for our title. 

  • This is the finished typography. In terms of manipulation it doesn't show how it has been manipulated explicitly. Overall, this is not as effective as it looked in Photoshop, however it fits in extremely well with our poster. 
  •  With the use of Photoshop alone we were not able to achieve the typography that we had hoped for – we ran into problems such as not knowing which kind of typography fit our genre. We ended up only using the smudge tool to manipulate the typography by smudging and smearing the colour of the typography from the corners of the letters. From producing the typography shown on the right,  we were not convinced that it showed off our ability to manipulate typography or if it was in fitting with our genre enough. To overcome this we chose 3 different fonts from Dafont.com and manipulated them yet in accordance to our 3 ideas seen here none of them proved to be adequate enough to suit our package as a whole. After using various tutorials online that showed us step by step on how to achieve a typography that we wanted we applied the same procedures to our chosen font and were left with. 
  •  A cohesive media package requires the same typography to be utilised throughout all products, which we have done. We used the font Dark Ages as our foundation, as seen on the right, which we downloaded, from the well-known font site, Dafont. From this we were able to manipulate our chosen font however we pleased to fit our package. Due to our inexperience using Photoshop to manipulate text, we started by only using the smudge tool, which quickly proved to be inadequate if we wanted to stretch ourselves. Therefore we explored the endless possibilities of what we could do with our typography. After thoroughly researching our ideas, we decided to keep our manipulation to the text extremely simplistic as our ideas were beginning to seem too elaborate, making the text unclear to read and unfitting with our package. 

  • Overall, as a cohesive package our main product and ancillary texts compliment each other. In the sense that the trailer, poster and website carry the high saturation levels, same typography and incorporate the same title and tagline. 

Evaluation Question 1 - Danielle

Evaluation Question 1

In what ways does your media product use, develop or challenge forms and conventions of real media products?

  • Our media product conforms to many aspects of the psychological genre. Prior to producing our 60 second teaser trailer we carried out our research thoroughly by deconstructing films which explore a similar narrative such as The Soloist and The Butterfly Effect Through this we were able to establish the conventions of the psychological thriller genre such as low-level lighting, use of canted framing shots, use of tight framing and dull grey and black colours. We were also able to recognise the distinct approaches of how to illustrate a mental illness. The Soloist illustrates the journey of the protagonist in a documentary way, whereas The Butterfly Effect delves into the enigma. After completing trailer deconstructions and rooting sources of inspiration to aid the development of our narrative we decided to produce a media product, which focuses solely on the discrimination of a teenage girl Schizophrenia.

Teaser Trailer
  • Typically, a psychological thriller trailer follows an anachronic modular narrative, which involves the use of flashbacks, and flash-forwards, which is one of the listed conventions. In this respect our 60-second teaser trailer conforms to this convention; our loft scene is an explicit example of a flash-forward as there’s acceleration in the narrative established through the use of our montage scene, which builds the downwards spiral of the protagonist.
  •  In combination with our use of non diegetic  eerie, discomforting and discordant sounds we develop our trailer to conform to the conventions of a psychological trailer as our use of non-diegetic sound also achieves a sense of perspective for the audience. An explicit example of this would be the ear ringing sound that we used in relation with oblique shots as our protagonist experiences a schizophrenic episode, which is shown on the right.
  • Furthermore we conform to the conventions of the psychological genre as it builds tension and provokes a scare factor among the audience. In combination with the sound, the use rapid cross cutting and fast paced jump cuts evoke the enigma and builds tension for the penultimate montage sceneHowever, we also challenge the conventions of a psychological thriller through our choice in cast. A convention of a psychological thriller is that the protagonist is a male, yet we challenge and subvert this convention by having both the protagonist and antagonist as females. Another way that we challenge and subvert the psychological thriller genre is by using little to no gore, and focusing solely on the actions that the protagonist performs due to her schizophrenic mind.
  • Sound was a large part of our trailer as the production took a while and had to fit with the ambience of the trailer.
  • I started by aligning the new non diegetic sound up with the production company clip, in order to have the sound begin as the production company is shown on screen, this was it eases the audience into the narrative of the trailer with no sudden changes in the sound too early on in the trailer. However, I did encounter an issue when inputting the non diegetic sound of the piano melody into the trailer.

  • Although I had made sure that the sound matched up to the exact timings of the trailer as I produced it, I did not trim the track of the "ear ringing noise" therefore it went on further than needed. To resolve this issue, I had to delete that individual track from the Logic Pro project, bounce the file and import it into our footage. From then, I had to import the "ear ringing noise" file into iMovie separately and adjust it by changing its fading options in accordance to the piano melody.
  • At this stage of inputting the sound into our trailer,  I decided that the other non diegetic sounds that we had recorded prior to making the piano melody such as the whispers would extremely well with our piano melody. I dragged the whispers into place and then had to make sure that they did not dominate the sound entirely. We also thought it would be effective to add the sound of an old TV as it would help build suspense and add to the relevance  of the bad TV effect on our  green screen footage. 
  • Overall, adding the sound to our trailer has definitely heightened the effect of it. The sound for our trailer becomes the climax in terms of sound. We made sure we were able to build tension threough using sound effects such as 'swishing' noises and sinister sounding crashes. We applied each track carefully making sure that nothing overlapped the other causing extreme discomfort in the sound all together.
  • We also had to make sure that the volumes of each track were fairly similar and worked well together, so we had to manually apply a fade out or fade in to certain tracks so the audio sounded together and not random and detached.


Poster
  • Furthermore, our poster challenges conventions by steering away from the conventional red, white and black colours that are traditionally seen within a horror film packages in film posters such as the Final Destination.
  • Prior to designing our own poster, we deconstructed psychological thriller posters as a means to gain inspiration. We started by deconstructing posters such as Jacob's Ladders' film poster. We noted that:
  • From the name, ‘fatal attraction’ we can understand that the director, Adrian Lyne has a reputation for directing horror films.•At first glance our eyes meet the blurred image of a face that remains centred but slightly to the right as if being pulled by something else, connoting possible disequilibrium in the movie.
    •The choice of a black background depicts that it isn’t necessarily a happy, light hearted comedy but quite the opposite as black connotes death. The black also mirrors the hidden depth of the story line that is revealed as the story itself is unravelled.
    • Similarly, the three colours used are black, white and red the traditional colours for a horror/ thriller movie. 
  •  During the process of deconstructing many film trailers we decided to challenge the conventions of psychological thriller film posters and utilize psychedelic colours within our poster. We used this as our initial idea after gaining inspiration after deconstructing the Butterfly Effect  film poster; which utilizes psychedelic colours within its main image.

  • The main image as you can see on the right is the silhouette of the protagonist casted against the clinical blue colour of butterfly wings presenting the psychological genre of the film as well as the concept of the film too.
  •  With this in mind, we decided to adjust the contrast, saturation and sharpness of the image through using Photoshop; we were able to pay closer attention to detail to the shadow casted behind our protagonists’ imaginary friend as we were able to stretch the shadow as much as we wanted to, allowing our poster image to come across with more of a professional and creative edge. 
  •  We also increased the saturation of the poster image to achieve the vibrancy that we now have present on our poster, in this respect we majorly subvert psychological thriller film posters as we do not use any of the conventional colours red, white or black. 


Website
  • After thorough research of other psychological thriller film websites we decided to edit the photos that we had taken during our photo-shoot to an extent that it challenged conventions. After deconstructing the Butterfly Effect we took on board the use of using fluorescent colours within our package. 
  • During the post production point after the photo-shoot we decided to adjust the saturation levels and utilize the Focal tool that allowed us to bring the image of the protagonist nearest to the camera into focus more whereas, it allowed us to blur out her imaginary friend. 
  • Developing this further we also used Photoshop to make a GIF. file of the image of the protagonist allowing us to achieve the disappearing effect of the image to reiterate the instability of the protagonist. Similarly, to our poster image we also edited the main image in terms of its saturation levels which also made the image appear at much more of a professional standard. It also added a vibrancy to the colours of the website, allowing the colours on the protagonist’s jumper, hair and features stand out a lot more than they did prior to the editing of the image.

Evaluation Question 4 - Danielle

Evaluation Question 4

 How did you use media technologies in the construction and research, planning and evaluation stages?
 
Photoshop:

Typography & Tagline
  • Along with the poster production, we also had to produce our own typography.  We used Dafont to search for a good font to form the foundation of ours typography that we wished to manipulate. After narrowing down to three fonts, we chose to go for a font called Dark Ages as it was simplistic enough for us to manipulate without making it look unprofessional. 
  • For this we also used Photoshop to  manipulate our typography  in fitting with our title and other media products. We started out by using the smudging tool on Photoshop to manipulate the ends of our title as our typography manipulating skills were extremely undeveloped. Once we had chosen a tutorial to carry out  we applied the skills that we learned to the creation of our typography. After realising that using the smudge tool was not sufficient we decided to use tools such as tiling and shading as well as using the stylising option on Photoshop many times in order to achieve the fragmented look of our final typography. However, lacking the skills for Photoshop at first was not our only issue.
  • After creating our final typography we had to transfer it onto a transparent background so we could use it on all of our media products, our website, poster and teaser trailer. Yet even when importing a copy of our typography onto our website, the transparent background turned grey, therefore making our typography look rather unprofessional and definitely ill fitted with the rest of our package.
  • Additionally, we were able to reverse the letter of our title too allowing us to get across the psychological element of our trailer. To do this we used Photoshop's "transform" tool to manipulate singular letters.
  • In terms of our tag line, we decided to use the font called "OldStyle" as we thought it was basic enough to manipulate and it also fit in well with the rest of our chosen typography. I started off by opening up a new file in Photoshop and making sure that my canvas was transparent therefore allowing it to be transferred onto our poster without any fuss. When typing our tagline into Photoshop, we decided to separate "herself" from the majority of the tagline so it would give us the option to move it around our poster.
    In order to manipulate our typography we applied a "wind" effect to our tagline. To do this we went to filter - stylize- wind and then selected wind from the menu going from the right. This made the typography look extremely worn out. This fits in well with our poster and our title as the mise en scene looks worn out as does our typography for our title. 
  • This is the finished typography. In terms of manipulation it doesn't show how it has been manipulated explicitly. Overall, this is not as effective as it looked in Photoshop, however it fits in extremely well with our poster. 
     
Poster
  • We also used Photoshop to produce typography for our trailer as well as contributing towards the production our poster. We started out by selecting the images that we wanted for our poster image; luckily we decided to carry out photo-shoots during every filming day in case we missed the opportunity. When filming our loft scene we noticed that we should carry out an extensive photo-shoot as the lighting, in combination with the mise en scene was provided great shadows against the wall.
  • Once we had selected our image, we started to edit it by adjusting the saturation and contrast levels the image to suit the rest of our package, as the use of psychedelic colours is a running theme through out our website, poster and teaser trailer.
  • We needed to make sure that our poster conformed to the narrative and genre therefore we took two images one with the imaginary friend (antagonist) and the protagonist - we then started off by using the lasso tool to cut away any remains of the image that were not needed, and then used the rubber tool to remove the hard to get to areas. We then cut the image of the protagonist tied to a chair and applied it to the image of the antagonist standing directly behind her to create the sinister poster image that is evident on our final poster.
  • However, we did run into a problem after finalising our final poster image. Psychological horror film poster are conventionally portrait, although our image was portrait we realised that it didn't fit the exact measurements of an A4 sheet of paper which meant that the poster would be distorted if it were to be printed out. However, we were able to overcome this issue by using the image size editor and scaling to size out tagline and title.

Pixlr Editor
Website
  • We used editing software such as Photoshop, Pixlr Editor and Wix to help us edit and produce a website for our trailer. One problem that we encountered was uploading our typography, titles and tagline onto the website without them distorting somehow.
  • For our website image, we used Photoshop's lasso tool to cut out one image of the protagonist and then used the rubber tool to get rid of any of the remaining image. Once we had achieved the image with the two images of the protagonist and her imaginary friend, we used Pixlr Express.
  • Pixlr Express allowed us to edit our image quickly and extremely efficiently. It also provided us with other options that Photoshop failed to give us, such as the focal tool.
  • We used the focal tool to bring focus solely to the protagonist rather than her imaginary friend allowing our audience to notice her first as she is our primary subject.
  • The focal tool also made the imaginary friend the secondary subject in on our website. This meant that the imaginary friend was the second object that our audience was drawn to.
  • Finally, we adjusted the hue, saturation and contrast of our image to again make sure that the colour scheme was in fitting with the psychedelic colour scheme that we chose to abide by.
  • Using Photoshop we made sure that each image was set to a transparent background yet once imported onto the Wix website, a grey colour covered it distorting the text and making it hard to read. It also made it look extremely unprofessional, however, we were able to overcome this by simply re-applying a transparent background onto the typography and re-inserting it onto the website.
Logic Pro
  • We also used sound editing software such as logic pro to our advantage to manipulate our sound that we had recorded by looping and layering our sounds to create a much thicker texture in sound and build up the suspense and anticipation that we wanted.
  • An explicit example of  looping and layering sounds is used within our green screen scenes, when the antagonists name is repeated for a while.
  • We recorded the sound as three individual tracks making sure that we used a quiet area with a good acoustic so it make the editing process a lot easier.
  • Once we had recorded I left the  audio clips at the length that they are at would prove to be too short to just insert into our trailer. To overcome this issue, I right clicked on a selected track and chose "loop" from the drop down menu and this looped each track. However, it became extremely predictable to listen to.
  • In order to overcome this problem, I had to select a specific amount of regions that I wanted, in this case I wanted three and then I spread them out along the other tracks at random to add to the tension and build suspense.
  • After this I trimmed the edges down and made sure that the track was even as possible towards the end. To do this, I faded it out towards the end and then bounced the file and converted it into an mp3 file. Therefore, I could sync it with iTunes and then drag it directly onto our footage.


iMovie
  • Throughout the process of producing our trailer we used iMovie and Final Cut Pro as our editing software. The main feature within our 60 second teaser trailer was the use of our green screen, which enabled us to stretch our editing skills.
  •  We carried out thorough research into how to edit our green screen footage as this was our first time using a green screen. We utilised all the editing software that was available to us from iMovie through to Adobe Premiere Pro  which allowed us to edit and manipulate our green screen footage in more accurate and specific way than iMovie offered.
  • To broaden our editing skills we developed our skills using  Photoshop  to help with our photo manipulation for our poster as well as our video editing skills for our website as it has includes an ongoing gif of the protagonist.
  • Additionally, we had to incorporate the recording symbol within our footage to convey the protagonist’s mental illness spiralling out of control.
  • A problem that we encountered when searching for a webcam overlay was that none of them had a transparent background. To overcome this dilemma we saved the image and opened it in Photoshop with a transparent background and used the eraser tool to erase the black background that was part of the original webcam overlay. This proved to be time consuming but it was a good alternative to using a webcam overlay that did not have a transparent background at all.
  • However, once we did this, we found a downloadable version of a webcam overlay that could be downloaded and applied to footage straight away. We simply imported the overlay into iMovie, making sure that advanced tools were switched on and then dragged it on top of our footage and selected "picture in picture" from the menu and finally adjusted the size of it around the frame of our footage.
  • We had to make sure that the webcam overlay remained the same size throughout all the footage that we applied it to as it was clear when the size of it dropped.

Thursday 27 March 2014

Evaluation Question 4 - Rebecca


4. How did you use media technologies in the construction and research. planning and evaluation stages?

Filming
Throughout out filming process, we had two major parts which required media technologies, we had to record a screen on a computer, and use a green screen. For the green screen, we had to use our storyboard to work out how to film in front of the green screen correctly. It took us several attempts until we got the shots we wanted from the green screen, but the end result we came up with during the editing phase was worth it.

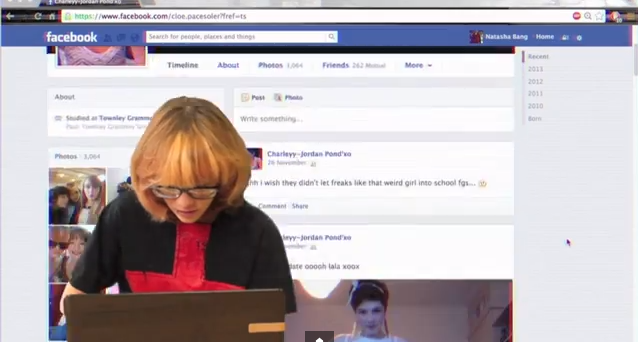
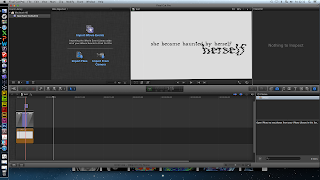
During part of our teaser trailer, in the background, the audience can see a Facebook profile scrolling in the background. We filmed our actor in front of the green screen, and to record the profile, we used software called Cam Studio. When using Cam Studio, you can change the quality, the area of the screen you want to capture, and of course what is on the screen. For this, we used one of our current Facebook profiles and customised it, so it looked as if it was our victim's own Facebook profile. This included changing the name, profile picture, and adding many fake posts to the profile, so that it fitted in well with the mise en scene of our teaser trailer. Here you can see our practice of using the software, before final editing had taken place.

Editing
For our teaser trailer, we predominately used iMovie for all of our editing, this is because we had a lot of experience in using iMovie and didn't have to waste time learning how to use the software. In iMovie we arranged all our clips into the correct place, added our sound and was able to trim down clips so our teaser trailer was no longer than 1 minute long.


In iMovie, as well as editing the length of the clips, and adjusting the overall narrative, we were able to edit the colours of some of the clips. We felt this was necessary to change the feel of the teaser trailer, and make it conform with the conventions of our genre. In this blog post, you can see how I edited the colours of the library scene, so that it became clear to our audience that our protagonist sees and lives life differently to the other characters in the trailer, and the red tinge also connotes danger, which follows our protagonist throughout the trailer.

However, we wanted to really impress with our editing, and this meant we had to do some editing outside of iMovie and import it in. For this, we used Final Cut Pro, as it has many more capabilities than iMovie and suited our needs for the montage sequence, green screen and titles.
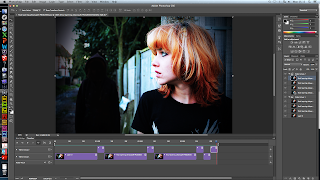

Montage Editing
For the editing of the montage sequence, we wanted to use many visual effects for the various clips here we had included, and Final Cut Pro was perfect for this. We were able to import all the clips we wanted, ranging from the ones we had filmed to the news footage, linking to the mental illness idea. Within Final Cut Pro, we were able to add effects, transitions and sound we had recorded to the montage, using more effects on top of the sound to distort it in the areas necessary. We found it much simpler to edit the montage sequence in Final Cut Pro, and it meant we had less restrictions placed on us which we would have had if we'd just used iMovie. Once the montage sequence was complete, we exported it and imported it into iMovie, positioning it in the correct place. You can read more about creating the montage

Green Screen Editing
Our green screen editing also took place in Final Cut Pro, because we found it to look very unprofessional in iMovie. We did a couple of trials before deciding on using Final Cut Pro, as we attempted it in iMovie and also Premiere Pro, however, we had more access to Final Cut Pro, and it was user friendly, hence why we made our decision to use it.


Sound
For the sound of our teaser trailer, we had to record our own sound effects and compose a soundtrack for the trailer. We had various inspirations for the sound used in our trailer, and researched the sounds used in various trailers, as can be seen here.

We first looked at various sounds we could incorporate into our teaser trailer, as we had different parts which needed catering for, such as the green screen section, montage, and ending. The media technology we used mainly was Logic Pro, as we had experience in this and found it easy to layer the sounds we wanted to experiment with.


Once we had recorded, and layered and edited our sound, we imported it into iMovie, to position it onto the clips which make up our trailer. This meant we had to decided what parts of the original sound to keep, and which parts to mute, so that only the soundtrack could be heard. We managed to complete all of this in iMovie, however, for the 
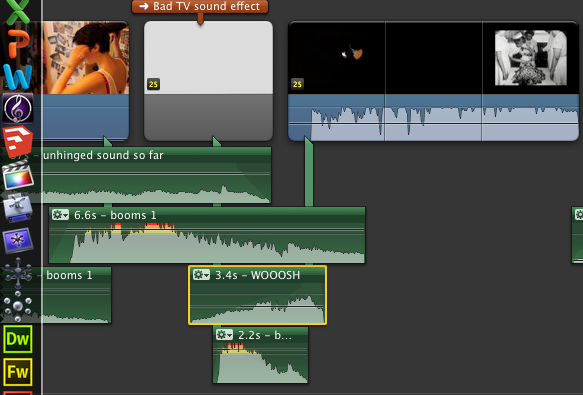
montage section we went back to Final Cut Pro, as it allowed extra precision in the short, face paced clips. iMovie wouldn't have allowed us to be this precise, and since we were exporting the sound and audio from the montage out of Final Cut Pro, it made sense to do it all at the same time.

One problem we did encounter at first when editing our sound was matching it up correctly with the titles and news footage clips throughout our trailer. We were able to simply drag and drop the sounds into the correct places, however once we imported files from various software into iMovie, such as the montage from Final Cut Pro, and soundtrack from Logic Pro, the overall soundtrack of our trailer became out of sync in places, and we had to merge the overlapping parts so they flowed into one another. Also this was a lengthy process as we had to keep replaying parts of the trailer to ensure it was correct, we did manage to do it in the end and are very happy with the outcome.

Titles
Throughout the development of our teaser trailer, we changed our titles many times. After deciding what they were going to say, we had to decide how we were going to present them on the page.

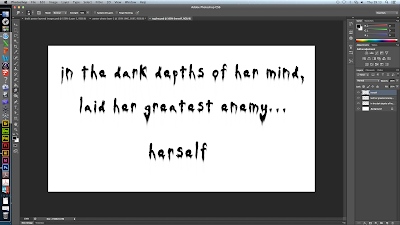
At first we decided to work on our titles within photoshop and went for a look which included the title appearing on an old piece of paper, made to look as if it was hand written with blood dripping over it. We achieved this look by beginning with a white background and one by one importing new layers, one for each letter of every word allowing manipulation of the typography, and then a layer for each drop of blood and the background, so we could add fluidity between the 'ink' and the blood.

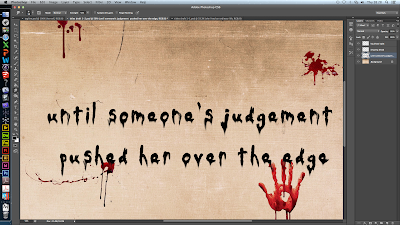
Here you can see the final product of our first attempt at creating the titles. However, we realised some problems with this method. Firstly, because we had created them in photoshop, it would be very hard to export them with the background and blood stains and successfully add effects within Final Cut Pro with it still looking professional. We also thought that the old piece of paper didn't conform to the conventions of our genre well enough, and perhaps gave the impression it was more of a slasher than a psychological thriller. Due to this, we started work on our next attempt of the titles.

For our second attempt, our first major change was to begin work within Final Cut Pro. We then decided to use a very simple background for the titles so that the emphasis would be more on what the titles said, rather than the background, and also it would bring our audience's attention to the effects we applied within Final Cut Pro. We decided that since our cultural link is mental illness and privacy, the effect 'Bad TV' within Final Cut Pro may give our titles the effect we needed to conform more to the conventions of our genre. We liked how this version of our titles much more, and so decided to import them into iMovie and include them in our final teaser trailer.

Poster design
For our poster, we used Photoshop heavily throughout the whole development, as it suited all are needs and would help us achieve a professional outcome. First of all, we used our initial plans as a base and expanded this out, completing several drafts of our poster.


We had several photo shoots throughout the time we were filming, and managed to get a few different photos we could work with and use as a base. In this draft, you can see how we used a photo taken in the library location, featuring our very first typography. We felt that this was a good idea, but upon editing it using Photoshop, we didn't think it looked very professional. So instead, we used the layers in Photoshop to have both a photo of our protagonist and her imaginary friend, in the same shot, which would later be the same thing we did for our website image.


Throughout the development of our poster, we had to focus on typography, because this is a major feature of the poster. For this, we again used Photoshop, and went through many different versions of typography that we had manipulated. First of all, we chose a font we felt fit well with our narrative, and then used some of the many filters and effects you can apply to the layers in Photoshop to manipulate it, so it was truly our own. Photoshop gave us the freedom to alter our typography once we had already placed it, as we found this was necessary quite late in the process because our poster wasn't looking professional enough. The biggest change you will notice that happened to our poster is the placement of the title, at the beginning it was just in one line, but the end product features it spread over three, looking like the letters are balanced upon each other and a shelf in our background image. We were able to incorporate this layout onto our website too.

Another part of typography that was important to develop for our poster, was the development of the tag line, where we again used Photoshop in the same way, because it allowed us to manipulate the text using the same 'Wind' filter as the main title was. This meant that the typography fitted together well and helped us to make it look professional.

Website design
For the development of our website, we were able to use several different media technologies alongside each other. We host our website on Wix, which allows us to edit the template of our website, the placement of all the elements on our website, and link to our social networks and teaser trailer.

Our website came a very long way from our initial ideas, and in order to complete it the way we did, we had to start with a plan of what we wanted. Following this plan, we were able to choose a background image to work with, which we hoped would be the background of our website.

In order to do so, we again had to use Photoshop to edit the image we wanted to use, in this post, you can see the editing I did, to create a viable image for use on our website. Photoshop allowed me to stitch two images together, while still looking professional, and edit the colours. I thought this was vital, because before editing, the photo looks very dull and not interesting, so by increasing the contrast and saturation, we were able to radically change how this image looked.

A feature we wanted to include on our website was a moving background, and we decided to do this by having the protagonist's imaginary friend appear and disappear from the background. We thought that on a website this would catch our audience's attention. In order to complete this, you can see how in this post, I created a gif using the time line tool in Photoshop, and saved it as the website's background on Wix.

Typography
Typography of course is another big part of the website, and was vital that we used the same as the poster and our teaser trailer, to create a professional package. We had many different versions of our typography, and it all stemmed from a plan we made at the beginning of the process. Here you can see how we went from a drawing to a basic design of possible typography, using the online service Pixlr Editor. This was good for playing with ideas, as it was easier to use than Photoshop and allowed us to practice with different typography manipulation before deciding on our final idea.

There was a while during the development of our typography where we played with the idea of using a inky looking typography, because we thought this would fit in well with our narrative and hint at the idea of kidnap. You can see here how we experimented with this idea.


However, we wanted to make it look really professional, and this trial didn't meet our expectations, so we moved on and created this, which is much more uniform and fits better with the conventions found in typography of products also in the psychological thriller genre.

Using the typography that had been manipulated for the poster, I was able to make slight adjustments, again using Photoshop, so that the images were transparent, and therefore would be successfully placed on our website without and grey backgrounds ruining our web page. You can see in my final post about the website, how I used the final typography and imported it into Wix, positioning it following a similar design as the poster, while ensuring the content was all in place on our web page. We used YouTube to have our teaser trailer playing in the middle of our web page.